
There’s nothing more disappointing than coming home from a shoot, feeling like you nailed it, and realizing your images are too dark, too bright, or just flat.
And at that point, there’s no fixing it. The moment’s gone.
You can have all the gear in the world, but even the smartest cameras still make mistakes. They don’t understand mood, subject, or nuance. They only see light and dark. That’s why it’s worth learning a few tools that give you more control when the light gets tricky.
Below are three exposure techniques I use regularly in the field to achieve the look and mood I want. Each one serves a different purpose depending on what you’re shooting and how much time you have.
1. Auto Exposure Bracketing (AEB)
This is my go-to method when I’m working fast or shooting in unpredictable light – like a storm rolling in, or that moment just after sunset when the light drops fast.
Bracketing means taking multiple exposures of the same scene: one at the camera’s suggested settings, and then one or more that are brighter or darker. This gives you options, and most modern cameras do it automatically through a feature called Auto Exposure Bracketing (AEB).
How it works:
You set your camera to AEB mode in the menu. Most models will let you bracket three or more shots. I typically set it to ±1 stop – one frame underexposed, one properly exposed (according to the meter), and one overexposed. Check your camera manual to see how to turn it on in your camera.


Once it’s set, just press the shutter. If you’re in continuous shooting mode, your camera will fire all three shots in one burst. Quick and easy.
If you’re shooting handheld, set your shutter drive mode to continuous. That way, your bracketed shots will line up better for editing later.
Best practices:
- Use Aperture Priority mode if you want to control depth of field. The camera will vary the shutter speed between frames.
- Use Shutter Priority mode if you want to freeze motion. In this case, the camera adjusts the aperture.
- If you’re shooting handheld, shoot in burst mode so the bracketed images align better – especially helpful if you plan to blend them later in post.
Example: I once photographed the Vancouver city skyline under a bright white sky. The camera’s light meter exposed for the sky, making the city too dark. But with AEB turned on, I had an overexposed version where there was detail in the buildings – and that’s the frame I used for my final edit.


When to use AEB:
- When the light is changing fast and you don’t have time to review every shot
- When the scene has high contrast (like bright skies and dark foregrounds)
- When you want options for blending exposures later
This is the safest bet for fast-paced conditions. You won’t always need all three exposures, but it’s good insurance.
2. Exposure Compensation
This is the method I turn to when I do have time to stop and look at the image – especially if I’m shooting a scene where the light isn’t changing quickly.
Exposure compensation lets you adjust the exposure up or down without touching aperture, shutter speed, or ISO manually. It’s a small shift, but it can make a big difference in how your photo turns out.
How it works:
After you take a shot, review it using the histogram. Don’t rely on the LCD on the back of your camera. The histogram gives you a better read on the exposure than the screen does.
And here’s why the histogram matters:
- The LCD preview is not 100% accurate. It shows you a processed JPEG version of your RAW file – not the full data.
- If you’ve changed your LCD’s brightness setting (for example, dimmed it for night shooting), it’ll throw off your perception in daylight.
- The image might look fine on the screen, but it could still be missing key data in the highlights or shadows.
The back of your camera isn’t a reliable judge of exposure. Always check the histogram instead of trusting how the photo “looks” on screen.
Reading the histogram:
- Left side = blacks and deep shadows
- Right side = whites and highlights
- Middle = mid-tones
A sharp spike on the left edge means clipped shadows – those areas are solid black with no recoverable detail. Sometimes that’s fine, especially in night scenes.
A spike on the right edge means blown highlights – pure white with no detail, and that’s usually not okay. You can’t recover blown-out highlights in post.
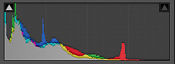
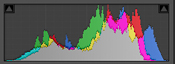
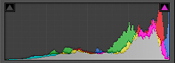
Using exposure compensation:
- If the image is too dark or the histogram is bunched to the left, dial the exposure up (+1/3, +2/3, +1 stop).
- If it’s too bright or spiking on the right, dial it down (-1/3, -2/3, -1 stop).
On my camera, I half-press the shutter and scroll the back dial to adjust exposure comp. Yours might have a dedicated +/- button or dial – check your camera manual to be sure.


When to use it:
- When you want to be intentional about how the image is exposed
- When you’re shooting in consistent light and can take your time
- When you’re working in Aperture or Shutter Priority mode and don’t want to go full manual
Exposure compensation doesn’t change your aperture or shutter settings directly – it just tells your camera to aim brighter or darker.
It’s a simple and fast way to fine-tune what the camera is doing – without totally overriding it.
Example: While photographing white pelicans on a bright day, the scene included a band of fog lit up by the sun – everything was glowing white. My camera’s meter tried to pull all that brightness down to 50% grey, which left the image looking flat and lifeless. I used exposure compensation to dial the exposure up by one stop, keeping the whites bright and giving the photo a clean, high-key feel that matched the mood of the moment.

3. Exposure Lock + Spot Metering
This is my favorite method when I want total control and I’m shooting something still — like a landscape, architectural detail, or a quiet scene with complex light.
It’s a two-part method: use spot metering to read light from a very specific point, and then lock that exposure in place before you recompose the shot.
Here’s how I use it:
- Set your camera’s metering mode to Spot. This makes the meter focus only on a small point in the frame — usually dead center.
- Point the camera at the area you want perfectly exposed — maybe a band of sunset sky, or the highlights on a person’s face.
- Press the AE-L (Auto Exposure Lock) button. This freezes the exposure setting based on that spot.
- Recompose your shot, focus, and take the picture.
Not sure where to find the Exposure Lock button on your camera? It’s worth checking your manual or doing a quick online search by model. On mine, the AE-L button is marked with a simple asterisk (*) on the back of the camera — easy to miss at first, but once you know it’s there, it becomes second nature.

Example: For a silhouette of the Battery Point Lighthouse, I pointed my camera at the sky, metered off the bright red clouds, and locked in that exposure. Then I recomposed with the composition I wanted and took the shot. As a result, the clouds were properly exposed, the lighthouse was underexposed, and I got the moody vibe I wanted – no blown highlights, no guesswork.

When to use exposure lock:
- When your subject isn’t moving and you have time to work slowly
- When the scene has bright and dark areas and you want to control which part is correctly exposed
- When you want precise, deliberate exposure decisions
This technique takes a little more effort, but once you get used to it, it becomes second nature – and it gives you complete control in complex lighting situations.
Exposure Is More Than Just a Setting
Most cameras are programmed to aim for a perfectly even exposure – midtones everywhere, no harsh shadows, no blown highlights. But “perfect” exposure isn’t always the right exposure. And it’s definitely not always the most interesting.
Sometimes, the best image is the one where the shadows fall deep and mysterious. Or where the highlights are bright enough to feel like summer sun. Or where the subject is lit perfectly, and everything else fades away.
Learning to control exposure means you get to decide what matters in the frame – and what can disappear. You get to create mood. Contrast. Mystery. Softness. Drama. Silence.
Your camera doesn’t know what story you’re trying to tell. That’s your job. These three tools – bracketing, exposure compensation, and exposure lock – are how you make sure the camera’s version of the world doesn’t override your own.
When you stop chasing “technically perfect” and start exposing for what you feel, that’s when your work gets personal.
Final Thoughts
There’s no one-size-fits-all exposure method. These three tools each serve a purpose – and once you know when to use them, they’ll save you from a lot of wasted shots.
- Use AEB when the light is changing fast and you need coverage
- Use Exposure Compensation when you want to make smart adjustments without switching to manual
- Use Exposure Lock when you’re composing slowly and want total control over your highlights or shadows
You don’t have to shoot full manual to take beautiful, intentional photos. You just need to know how to guide your camera, read the light, and make a few purposeful choices.
These tools don’t just help you get the shot. They help you make it yours.

I’d love to hear what this brought up for you – a technique you’ve tried, a challenge you’ve faced, or a favourite photo where getting the exposure right was tricky.
Even a simple “thanks” or “me too” is always appreciated!
Ready to Take Full Control of Your Camera?
If you’re ready to move beyond auto mode and start making intentional, creative choices with your camera, my eBook Taking Control will help you get there.
It walks you through the essential camera settings — aperture, shutter speed, ISO — in simple language, with plenty of visual examples, so you can start shaping your photos the way you see them.
I know this is 2025 stuff but can you elaborate more on “then recomposed so the lighthouse was in shadow”.
Hi Shaun, Thank you for pointing this out, I didn’t do a good job on that sentence! I am going to fix it in the post. What I meant was that because I metered on the red clouds in the sky, they are properly exposed, and therefore the lighthouse and the foreground are underexposed and quite dark in the frame. Whereas if I had metered on the lighthouse, it would be properly exposed and the sky would be much brighter and the whole dramatic vibe would be gone. I hope that makes sense! Thanks for your comments, much appreciated.
It does and thanks for responding.
Thanks for this reminder. I know about spot metering but never think to use it.
You are very welcome Don, glad you enjoyed the tutorial!
Hi Anne, I actually didn’t read your article—I clicked on the thumbnail photo because I recognize it as the lighthouse in Crescent City, CA. My grandparents lived just north of there, and I spent my childhood summers in the area, so it’s very dear to my heart. You have captured it beautifully without the usual kitschy look one often sees. Thank you for this beautiful photo. It brings back a lot of memories of watching beautiful sunsets with my grandparents—I’m looking now at buying options!
Thank you so much Helen, that means a lot to me that I captured the spirit of the place from someone who grew up there. I have another photo of the lighthouse that is on the cover of one of my books. You can see it here: https://blog.annemckinnell.com/accelerate-your-photography/
It’s amazing how different the two photos of the same place place are – and all due to different lighting conditions. Thanks for your comments, I appreciate it!
Thank you for this. I have taken photos for years and sometimes it seems like I get worse instead of better. I need these reviews and new ideas. I’m too often in a hurry and don’t always need to be. I’m anxious to get out and try these.
You are most welcome Carol! I think all photographers go through those phases. It’s so easy to get into the habit of doing things the same way all the time. Happens to me too! Hope you enjoy trying the new techniques and thanks for the great feedback.
some how Anne you put this in plain English for every one even a novice like me
thank you
I love receiving this kind of feedback, Jon, thank you. That is exactly my objective! Much appreciated.
Anne,
Clear and practical explanation of great tools.
Thanks for the positive feedback Augie, glad you found it helpful.
Great article. Answered some questions I didn’t know I had. Where is your back button focus controlled from? Mine is the AE-L button. Thanks for taking the time to educate us
Hi Greg, on my Canon 7D, I have a button called AF-ON and I programmed it to be back button focus. I should do a tutorial on that, I love using back button focus for wildlife photography. I don’t use it for landscapes, so I haven’t done that with my Sony camera (which I primarily use for landscapes). Glad you enjoyed the post, thanks for your comments!
Thank you. Very interesting!
You are most welcome Eric, glad you enjoyed it.
There is a continuous struggle between the flat RAW foto and the finished process one
Don’t forget that a properly exposed raw image makes it easier to fine tune. And the sensor picks up the information you want.
Absolutely, when you have a properly exposed image you have all the data you need in the file to process it the way you want. Good point. If you have solid blacks and try to brighten them, you get noise, and if you have blown out highlights your photo is just garbage. There’s no coming back from that! Your comments are appreciated Lamyrus.
This is true Kapil. RAW photos can look dull and grey, but they have all the data in them that we need to process our images the way we want them to be. Just look at is as part of the creative process, it doesn’t have to be a struggle. Thanks for your comments!
Thank you Anne. An excellent article once again and so practical. I often use increase the ISO when shooting birds against a bright sky. I was going to share a shot but it won’t “paste” for me. Increasing the ISO has been such a game changer for my results.
Hi Cecilia, increasing the ISO will make your photo brighter, assuming the other two values in the exposure triangle stay the same. So you are using ISO to overexpose. Which is usually what you want if you are shooting something bright because you camera will try to make something in the frame 50% grey. I’m glad you found a technique that works for you for your shooting situation. There are so many different ways to accomplish the same goal in photography, we just have to find the one that works for us. Thanks for sharing your technique and I’m glad you enjoyed the post!
When you’re an average photographer you’re 18% grey. I subscribe to Joe Edelman’s set Shutter speed with Purpose, Aperture with feeling, use auto ISO for brightness.
Hmmm, interesting. I haven’t heard that before, but I think you can use all 3 components of the exposure triangle creatively to add emotion to a photograph. Thanks for your visit and comments Larry.
This is well -written. It is by far the best succinct guide to exposure that I have read.
Thank you very much for the awesome feedback Ken! Succinct is definitely my style. I dislike reading things that have too much fluff so I like to get right to the point. Your comments are most appreciated!
Many thanks for excellent help
You are most welcome Steven, glad you enjoyed the post.
I have stopped the fun part of my life with photography for a number of years due to my husband’s MS and needs. But I remember happily your online group course of a number of years back. This tutorial makes me think maybe I can gradually shift back into taking time for photography if I limit myself right now just to these few tried and true methods you have suggested, Anne!
Thank you!
Priscilla G.
Priscilla, I’m sorry to hear about your husband’s MS, I know that an illness puts a lot of stress on everyone involved. But it is good to take a bit of time for yourself, even if it’s just 15 minutes, to focus on something good and beautiful and photograph it. It doesn’t have to be anything exotic or far away. Just find something near you that is beautiful. A fern (that happens to be what is outside my window right now). It can do wonders for your state of mind. I have one reader who is in an assisted living facility and has mobility issues and she told me she photographs objects through a glass a water to make interesting abstracts! I thought that was so creative and what a great way to stay involved in photography even when she can’t get around very well. Or, have you heard of the ice thing? People use some kind of a small tray that fits in a freezer, put water in it, and then put flowers in it, freeze it, and then photograph the frozen flowers. I’ve been meaning to try it. Anyway, just some ideas for you. Take care of yourself!
After seeing your Auto Exposure Bracketed shots and then the final result, you have motivated me to give it a try next time I’m out!
Thank you!
That’s great, I’m always happy to hear that I’ve motivated someone to try a new technique. Many thanks for your feedback Mike.
Excellent information. I use #2 & #3 a majority of the time. #1 with a tripod .
Interesting. I use AEB a lot hand-held when I am just walking around and things are changing quickly. Although I also use AEB if I think I might blend exposures and of course I do that with a tripod. There are so many different situations, it’s good to have all these tools in the toolkit as they say. Thanks for your comments Herb.
“But the truth is, even the most advanced camera is just trying to make everything “average.” Somehow this obvious fact eluded me in my earliest years. When I talk about photography with new young photographers, I try to always mention it. One never knows what all is going on in their minds. Even though cameras have advanced quite a lot in the last 40 years, I want to try and save them from the embarrassment of repeating some of my struggles.
It’s so true! When we’re just starting out we are just trying to get a proper exposure, which is good, but once you learn that you can start pushing the boundaries to get a more moody exposure by putting all the attention on what is most important in the frame. Thanks for your comments Marv!
Sometimes I regress back to my film day ànd will take a reading off the back of my hand if I can place it in the same light that is falling on my subject. But to this and get positive results just make sure that the back of your hand is well sun tanned . Worked form , works for digital.
If y’all ever drag your RV down to Texas during April drop me an email and I’ll take y’all shooting wildflowers in the Texas Hill Country.
Well, there’s an idea I never thought of! We used to carry the grey cards around for that but using the back of your hand would probably work fine. Especially when you have those high contrast scenes and it’s hard to get the exposure just right. I’ll have to give this a shot. Thanks for the idea Johnny.
And thanks for the invite for wildflower shooting in Texas. Normally we are coming back home by April. I just looked at my photos and it’s been 10 years since we’ve been to Texas. I can’t believe it’s been that long. The last time we were there it was mid-March and the wildflowers were gorgeous. We were around the Big Bend area. I’d really love to go there again. So you never know, I might take you up on your offer sometime!